Pages

Tuesday, 14 January 2014

How to download google apps to PC without any software


We have been testing and reviewing a lot of Android phones and tablets in the recent past, and we definitely need to keep a few apps for benchmarking and other such information. In order to do the same, we initially need to set up wireless networking, punch in the credentials of the Google account, then search for the needed apps and download them. Downloading apps from the Google Play Store requires an account and hence the entire exercise. This is not only time consuming, but also painfully slow at times when the Internet connection is down or weak. In order to get things in the fast lane, we use an app to back up the apps 
and save them on the PC. On the other hand, as we all know, most apps keep being updated by their developers and tracking the updates is not possible if we do not have the Google account setup on the Android device. This means doing the same thing all over again and hitting the 'Update App' button every time we have to test a new device. 

Steps To Follow:

Paste the copied playstore apk link here.(AS SHOWN IN THE IMAGE)
             
  • Click on the "generate download link" and wait for minute or 2 .
  • Your download option will appear.
  • Click on save option.
Hope you liked it .
IF YOU HAVE ANY DOUBTS AND QUESTIONS PLEASE LEAVE A COMMENT
I WILL FEEL GLAD TO REPLY .
WAITING FOR YOUR COMMENT. 

Monday, 13 January 2014

How to hide icons/folders on desktop that they do not open

Steps To Follow:

  • Go to desktop screen and press printscreen in your keyboard.
  • open mspaint or any other software and paste it(ctrl+v or right click and paste it)
                                                                                                                          
  1. Go to file and save the pasted image in mspaint.
  2. open it and right click on it as select "set as desktop background".
  • Go to desktop,right mouse click "VIEW>SHOW DESKTOP ICONS"
             
  • Now you are done with it 
 NOW TO RESTORE IT DO THE ABOVE STEP ie again check the option "show desktop icons"

Hope you liked it .
IF YOU HAVE ANY DOUBTS AND QUESTIONS PLEASE LEAVE A COMMENT
I WILL FEEL GLAD TO REPLY .
WAITING FOR YOUR COMMENT. 

Saturday, 29 June 2013

Create a Desktop Wallpaper Slideshow in Windows 7/ Vista

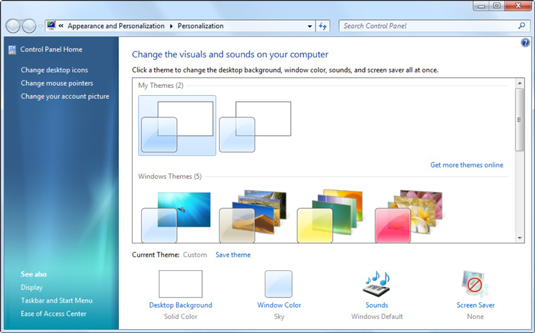
  1. Right-click an empty part of the desktop and choose Personalize.
    image0.jpg
    Windows hops to the Control Panel’s Personalization pane.
  2. In the lower-left corner, click the Desktop Background link.
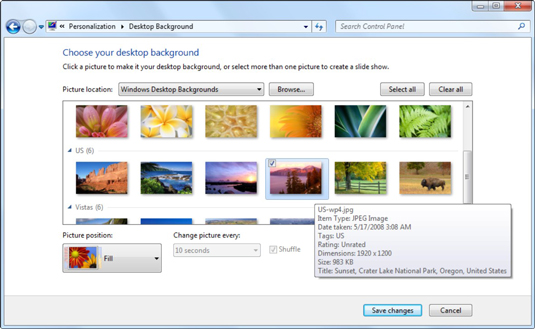
    You’ll see the Desktop Background window.
  3. Hover the mouse over any picture you want to include in the slide show and then select the check box that appears.
    image1.jpg
    The box will appear in the upper-left corner. You can choose as many pictures as you want.
  4. Select all the images you want to include.
    If necessary, use the drop-down menu to select other picture folders for Windows to look in or select from the Windows 7 built-in collection of solid colors or photos or to pull out your highest-rated photos.
    You can also create a slideshow by selecting a theme that has more than one picture.
  5. (Optional) Select the Shuffle check box.
    The pictures will appear randomly in the slideshow. If you prefer, keep it unchecked and they will appear in a loop.
  6. (Optional) Set the speed of the slide show in the Change Picture Every box.
    This will determine how quickly the images change.
  7. Choose how you want the pictures to appear in the Picture Position drop-down list.
    Use this drop-down box to determine the placement of the images. Your options are Fill (stretched to fill the screen), Center, and Tiled.
  8. Click the Save Changes button and then the Close (X) button.
    The Control Panel’s Personalization pane will close and you’ll see your desktop with one of the pictures you chose displayed. Your new wallpaper settings take effect immediately.

Thursday, 27 June 2013

Access Your Desktop From Android (RDM+ Remote Desktop )

RDM+ Remote Desktop

Description

Access and control your Mac or Windows PC remotely right from your mobile device with RDM+ Remote Desktop app.
Don't be tied to your home or office computer. Send and receive e-mails, edit documents, surf the web, manage files and do hundred other things that you usually do on your desktop, even when you are on a business trip or stuck in a traffic jam.
Simply install mobile application on your Android and RDM+ Desktop on the remote computer and RDM+ is ready to use. No need to adjust any firewall or router settings."In a short time, your desktop's screen will be displayed on your Android phone and you can pretty much do whatever it is that you want to do."
ANDROID-APPS.COM
Why RDM+ is really a must-have tool for you?
- Sometimes you need to check or edit your documents, and your computer is nowhere near you. Do it easily using familiar mouse commands, standard Windows and Mac hotkeys. Pinch to zoom in/zoom out.
- Copy, rename, delete files, send them from PC to your Android and vice versa with built-in file manager.
- System Manager: see how your desktop is doing while you are away from home. Check and change system settings, execute command line commands, control running processes.
- Works via both WiFi and carrier data network.
- Ultimate security level makes your data exchange absolutely safe. Master password protects list of your computers, so even if your device is stolen or lost, noone could access your information.
- Easy access for enterprise users through NAT and Firewall as well as for individual users with dynamic IPs.
- No hidden costs. Application price is a one-time fee. Connect to any number of your desktop computers without any additional charges.
- Available in English, Spanish, German, French and Italian.
Note: Free RDM+ Desktop application should be installed on each computer you want to have access to.

  Downloading Links
                    ||Download Via Single Links  Size:973KB||
                                ||
GOOGLE PLAY(PRO)||EXTERNAL LINK||EXTERNAL LINK||

Friday, 17 May 2013

How to make a bootable USB Drive

  • How to make a bootable USB Drive

We all know that on Reformatting a computer device or laptop, or notebook we need a Bootable Disk CD for windows XP and DVD for windows 7. but what if your  CD or DVD Drive  is not working anymore? so here is the best solutions for you.

  •  Okay let me help you!

All you need is the following
1. 1GB USB Drive For Windows XP
2. 4GB USB Drive for windows 7
3.Operating System ISO file or image file of Windows 7 or Windows XP
4. Power ISo application software that you can DOWNLOAD HERE
Okay lets START!!!

  • Install your Power ISO application and when your done open it and Locate for TOOLS and "CREATE A BOOTABLE USB DRIVE" and then another windows pop-up and this time you need to select the file and Destination of your file or the Operating System.
  • On the source image file  locate the ISO file or the image file of your windows 7 or windows XP then Insert your USB .and locate Destination Usb drive locate which USB you inserted on your pc
  • Then Tick the Start button and wait until its say your DONE
  • After that you have it You have a Bootable USB drive.

HOW TO CHANGE FOLDER ICONS?

Change icons of folders this new year.

Steps :-

-Right click on the folder.
-Then click on the properties.
-Then click on customize tab.
                             

-Click on 'Change icon...' 

-We can select any from the list or if we are having more icons then click on browse and locate them.
-After selecting icons click OK.

  If you want to download more icons then click below.

Transform your phone/tablet into a wireless mouse, keyboar


WiFi Mouse Pro


Transform your phone/tablet into a wireless mouse, keyboard and trackpad using WiFi Mouse. WiFi Mouse supports speech-to-text as well as multi-finger trackpad gestures. WiFi Mouse enables you to control your PC, MAC or HTPC effortlessly through a local network connection.

Features:
* Mouse curser movement
* left and right click support
* Middle mouse button scroll
* Remote keyboard input
* Speech-to-text input for all languages
* Mouse & keyboard full screen
* Auto-connect on application startup
* Compatible with XP/Windows Vista/ Windows 7 / Mac OSX
* Support Android and IOS
Gestures:
* Tap-to-click
* Two finger tap for right click
* Two finger scroll
* Pinch to zoom
* Three finger drag or highlight
* Four finger swipe up to maximise current window
* Four finger swipe down to show desktop
* Four finger swipe sideways to change current window focus
* Left handed mouse support (swap left and right mouse click


Powered by Blogger.

Translate into your language


Blogger news

Blogroll

Blogger Widgets

About